I. Introduction
As a parent, ensuring the safety and well-being of your child is paramount. While we hope to never face a life-threatening emergency, being prepared can make all the difference. One of the most crucial skills a parent can possess is the ability to perform Cardiopulmonary Resuscitation (CPR) on infants and children.
CPR knowledge is invaluable for parents for several reasons:
- Quick response: In emergencies, every second counts. Knowing CPR allows parents to act immediately while waiting for professional help to arrive.
- Increased survival rates: Prompt and effective CPR can significantly increase the chances of survival in cardiac arrest situations.
- Confidence in emergencies: Understanding CPR techniques can help parents remain calmer and more focused during high-stress situations.
- Prevention of brain damage: By maintaining blood flow to the brain, CPR can prevent or minimize potential brain damage due to lack of oxygen.
It’s important to note that CPR techniques for infants and children differ from those used for adults. These differences account for the smaller size and more delicate nature of young bodies. In this article, we’ll explore these distinctions and provide a comprehensive guide to infant and child CPR techniques.
II. Understanding the Basics
Before delving into specific techniques, let’s cover some fundamental concepts:
A. Definition of CPR
CPR, or Cardiopulmonary Resuscitation, is an emergency procedure that combines chest compressions with artificial ventilation. Its purpose is to manually preserve brain function by maintaining blood circulation and oxygenation when the heart and breathing have stopped.
B. When CPR is needed
CPR should be performed when an infant or child:
- Is unresponsive
- Is not breathing, or is only gasping
- Has no detectable pulse (for healthcare providers)
C. The chain of survival
The chain of survival is a series of actions that, when performed quickly and effectively, can greatly increase the chances of survival from cardiac arrest:
- Early recognition and call for emergency services
- Immediate high-quality CPR
- Rapid defibrillation (when appropriate)
- Advanced life support and post-cardiac arrest care
As a parent, understanding and initiating the first two links in this chain can be life-saving while waiting for professional help to arrive.
III. Key Differences: Infant vs. Child CPR
Understanding the differences between infant and child CPR techniques is crucial for providing effective care. Here are the main distinctions:
A. Age group definitions
- Infant CPR: For babies from birth to 12 months old
- Child CPR: For children from 1 year to puberty (around 12-14 years old)
B. Hand placement and compression technique
Infants:
- Use two fingers (index and middle) for chest compressions
- Place fingers in the center of the chest, just below the nipple line
Children:
- Use the heel of one hand for smaller children
- For larger children, use two hands (one on top of the other) as you would for adults
- Place hand(s) on the lower half of the breastbone
C. Compression depth
- Infants: Compress the chest about 1.5 inches (4 cm) deep
- Children: Compress the chest about 2 inches (5 cm) deep
For both groups, ensure full chest recoil between compressions.
D. Rescue breaths
Infants:
- Cover both the mouth and nose with your mouth
- Use gentle puffs of air from your cheeks, not deep breaths from your lungs
- Each breath should last about 1 second and be just enough to make the chest visibly rise
Children:
- Pinch the nose closed
- Cover the child’s mouth completely with your mouth
- Give normal breaths, each lasting about 1 second
- Watch for the chest to rise with each breath
IV. Step-by-Step Guide for Infant CPR
A. Checking responsiveness
- Gently tap the infant’s feet or shoulders
- Call the infant’s name
- Look for any movement or response
B. Calling for help
- If alone, perform CPR for 2 minutes before calling for emergency services
- If someone else is present, have them call for help immediately while you begin CPR
C. Chest compressions
- Place the infant on a firm, flat surface
- Use two fingers to compress the center of the chest
- Perform 30 quick compressions about 1.5 inches deep
- Allow full chest recoil between compressions
- Aim for a rate of 100-120 compressions per minute
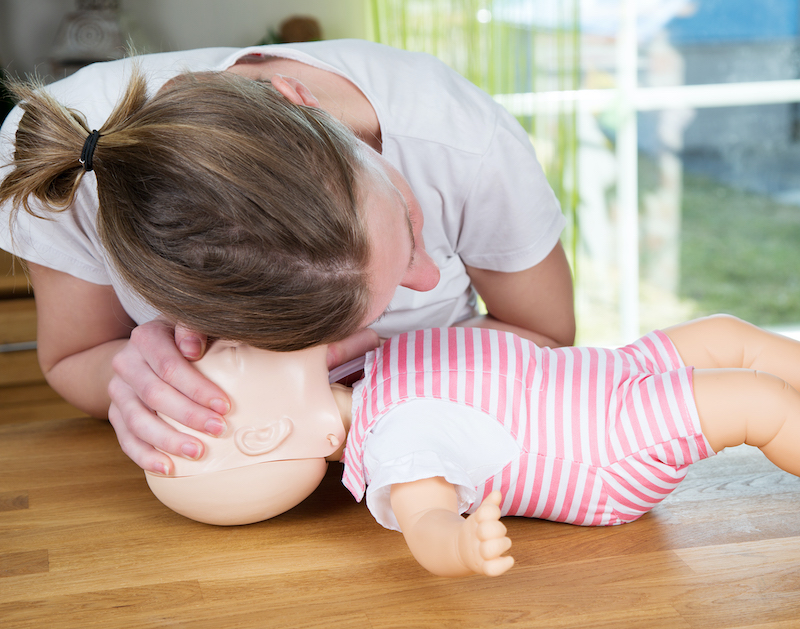
D. Rescue breaths
- Gently tilt the head back and lift the chin to open the airway
- Cover the infant’s mouth and nose with your mouth
- Give 2 gentle puffs of air, each lasting about 1 second
- Watch for the chest to rise with each breath
E. Compression-to-breath ratio
- Perform cycles of 30 compressions followed by 2 rescue breaths
- Continue this cycle until help arrives or the infant shows signs of life
V. Step-by-Step Guide for Child CPR
A. Checking responsiveness
- Tap the child’s shoulder firmly
- Call out loudly to the child
- Check for any movement or response
B. Calling for help
- If alone, call for emergency services immediately before starting CPR
- If someone else is present, have them call for help while you begin CPR
C. Chest compressions
- Place the child on a firm, flat surface
- Use the heel of one hand (or two hands for larger children) on the lower half of the breastbone
- Perform 30 quick compressions about 2 inches deep
- Allow full chest recoil between compressions
- Aim for a rate of 100-120 compressions per minute
D. Rescue breaths
- Tilt the head back and lift the chin to open the airway
- Pinch the nose closed
- Cover the child’s mouth completely with your mouth
- Give 2 normal breaths, each lasting about 1 second
- Watch for the chest to rise with each breath
- Compression-to-breath ratio
- Perform cycles of 30 compressions followed by 2 rescue breaths
- Continue this cycle until help arrives or the child shows signs of life
VI. Choking Response
While not strictly part of CPR, knowing how to respond to choking is equally important for parents.
A. Infant choking protocol
- Hold the infant face down on your forearm, supporting the head
- Give up to 5 back blows between the shoulder blades with the heel of your hand
- If unsuccessful, turn the infant face up and give up to 5 chest thrusts using two fingers in the center of the chest
- Alternate between back blows and chest thrusts until the object is expelled or the infant becomes unresponsive
B. Child choking protocol
- Stand behind the child and wrap your arms around their waist
- Make a fist with one hand and place it thumb-side against the child’s abdomen, just above the navel
- Grasp your fist with your other hand and give quick, upward thrusts into the abdomen
- Repeat until the object is expelled or the child becomes unresponsive
If the infant or child becomes unresponsive during choking, begin CPR immediately.
VII. Common Mistakes and How to Avoid Them
A. Inadequate compression depth
- Ensure you’re compressing deep enough: 1.5 inches for infants, 2 inches for children
- Don’t be afraid to push hard; the chest should visibly depress with each compression
B. Improper hand placement
- For infants, keep fingers in the center of the chest, just below the nipple line
- For children, place hand(s) on the lower half of the breastbone
C. Interrupting compressions for too long
- Minimize breaks between compressions
- When switching rescuers or checking for breathing, try to limit interruptions to less than 10 seconds
D. Ineffective rescue breaths
- Ensure the airway is properly opened before giving breaths
- Watch for chest rise with each breath; if the chest doesn’t rise, reposition and try again
VIII. Importance of Regular Training
While reading about CPR techniques is helpful, nothing replaces hands-on practice and professional instruction.
A. Hands-on practice
- Attend in-person CPR classes that provide practice on infant and child mannequins
- This allows you to get a feel for proper hand placement, compression depth, and rescue breath technique
B. Keeping skills up-to-date
- CPR guidelines are periodically updated based on new research
- Refresh your training every two years to stay current with the latest techniques
C. Building confidence in emergencies
- Regular practice helps build muscle memory
- This can help you respond more confidently and effectively in high-stress situations
IX. Conclusion
In conclusion, educating parents on infant and child CPR techniques is a crucial step in ensuring the safety and well-being of our youngest and most vulnerable family members. These life-saving skills can make all the difference in critical situations, potentially preventing tragedy and giving parents the confidence to act swiftly when every second counts.
Don’t wait for an emergency to strike – take action now to protect your loved ones. Enroll in a CPR certification course in Tampa to gain the knowledge and skills you need. CPR Tampa, an American Heart Association training site, offers comprehensive CPR and first aid certification programs tailored to your needs. Whether you’re seeking initial certification or renewal in BLS for Healthcare Providers, ACLS, PALS, or general CPR and First Aid, CPR Tampa has you covered.
Their stress-free, hands-on classes ensure you’ll learn effectively in a supportive environment. By choosing CPR Tampa, you’re not just getting certified – you’re getting the best CPR training in Tampa. Invest in your family’s safety and peace of mind today. Visit CPR Tampa’s website or contact them to enroll in a course and take the first step towards becoming a prepared and confident parent.
Remember, CPR certification in Tampa isn’t just a piece of paper – it’s a vital skill that could save a life. Don’t delay; equip yourself with the knowledge to protect those who matter most.


